(If you are a foreigner living in Japan, and you're looking for some good materials to study in
preparation for the Driver’s License Test in Fukushima Prefecture, click here)
Japan has a fetish for precision. In this country, people will pay over $100
for perfect fruit (grown painstakingly to perfection in atmosphere-controlled
greenhouses). During their elementary
and high school years, students will spend countless hours tracing and
re-tracing kanji, slowing and patiently memorizing the stroke order of over
2,000 kanji. I recently observed a father teach a ping
pong lesson to his two young boys (maybe 5 years old and 7 years old): they didn’t
even hit a ping pong ball; they just carefully practiced the hitting motion
with the paddle, time and time again, to attain precision.
This context will give you some insight into why the Driver’s
License Practical Test may have been the most difficult test I’ve ever had
to take!
I’ve been successfully driving in Japan for over 6 months
with my International Driver’s license (I applied for it on-line before I left
the USA). However, this expires one year
from issue, at which point Japanese law requires you to obtain a Japanese
license. I took to driving on the left
side of the road pretty quickly, and I understand most of the common traffic
signs and road markings. How hard could
it be to pass the Japanese Driving Test?
Last Friday Joel and I, along with Nomura Sensei, went to
the Fukushima Driver License Center, in high hopes that we would, at the very
least, leave with a better understanding of how to correctly navigate through
the system to get a Driver’s License.
Apparently, just managing to bring all the required documents and
correctly filling out the paperwork is considered quite an accomplishment. And, maybe, just maybe, we’d pass a test or
two in the process.
The Documents:
Obtaining all the correct documents was no easy task. I needed to bring the following:
·
Foreigner's ID card
·
Current address verification form from the City
Office
·
Passport with appropriate Visa (you can’t get a
driver’s license on a tourist visa)
·
Foreign Driver’s License (state of Minnesota for
me)
·
The translation of your foreign driver’s license
(obtained by visiting the Japanese Automobile Federation office and paying
¥3000)
·
A certified letter from the Minnesota DVS that
states the year, month, and day that
I received my license, proving that I had, in fact, driven in the United States
for at least 3 months with my current license (I renewed my Minnesota Driver’s
license on Oct. 4th, 2011 – however the issue date on my actual card
says “10/2011”)
·
A letter written in English and translated into
Japanese explaining the above certified letter
·
One 3cm x 2.4cm picture taken at an official
photo booth (they’re at most convenience stores)
·
International Driver’s License (if you have one)
.JPG) |
| Download this picture for the list of required documents (in Japanese) |
The Paperwork:
We arrived around 8:30am and began filling out some
paperwork. This was no small task. Even the simplest information can be
complicated. For example, my name, Eric
Walter Selle is written (in katakana): エリック ·ウオルター ·セリー,
my address (in kanji) is: 福島県福島市野田町 . . . etc. Even my birthday is slightly complicated. It’s written: 昭和56年04 月12日 (I was born in 1981, but Japan has
a different system of counting years – based on the number of years the current
emperor has been in charge. The current year is: 平成24年.
The year of my birth was 昭和56 – when the previous emperor was alive. Nomura Sensei had to consult a small
chart in his daily planner to figure this one out – or you can go to this nifty website).
We also completed a checklist, ensuring that we submitted
all the required documents, another form to be used for our official interview,
and were given a fourth form to show to the cashier (in a different part of the
building) and pay our ¥2200 fee.
The Waiting:
Then we waited. There
was much waiting throughout the day. Japanese
are also known for enduring long periods of waiting. Did you know that you don’t make a doctor’s
appointment in Japan? You just go to the
office and wait in line. Yep.
The Interview:
At around 10:00am a Japanese officer called our names and
brought us to a table to conduct the interview.
Thankfully, Nomura Sensei was there to translate this for us. The questions weren’t easy for him to explain
in English. The officer asked some very
specific questions about our driver’s education and testing. “How
much did your driving school cost?” “How
many questions were on the written test?” “Who administered the test?” “What
percentage of questions did you get correct?”
“What would be considered a failing grade?” “How long (in meters) was the driving course
that you took your practical test on?” “How
large (in cubic centimeters) was the engine of the vehicle you were tested
on?” Joel and I confidently answered
all of these questions . . . perhaps making an educated guess or two (or ten).
With the interview wrapped up in about 15 minutes, we waited
some more. For another hour. Nomura Sensei left to get some work
done. He promised to return around
11:30.
 |
| Joel (seated next to Nomura Sensei) studying for the test |
The Eye Exam:
At 11:15am the same officer called us back to complete more
paperwork and take an eye exam. We were
a little dismayed that Sensei hadn’t yet returned, but the officer helped us
out, and we actually did okay. The eye
exam is actually pretty easy, only requiring a very limited amount of Japanese. You need to correctly identify the traffic
light colors red (Aka), yellow (Kiro), and blue, yes - blue (Ao), and tell which direction a very small cursor is pointing
(up, down, left, or right). I passed
without my glasses (something I wasn’t able to do in the USA).
The Written Test:
Immediately following the eye exam we each (individually)
took the written test. I had to chuckle
when I saw the single chair and desk
in the center of the room, with a clock directly in front of you at eye
level. There are ten true/false
questions for the written test, in both Japanese and English (hallelujah!),
with big pictures illustrating each question.
You have exactly 5 minutes the finish the test and a 70% is a passing
grade.
The written test is known for being relatively simple, but
there were a few questions that stumped me.
For example: “In the event of
major earthquake, you should pull your vehicle to the side of the road, if
possible. Turn off the engine, leave the
key in the ignition, close the windows, leave the doors unlocked and evacuate
the area.” Yikes! That one wasn’t covered in my American
driving test. I guessed (correctly, as
it turned out) “True”. For the record,
we asked Nomura Sensei afterwards, and he didn’t know the answer. (Click here to see more sample
questions) We waited back out in the
lobby for another 10 minutes to discover we had both passed the test!
Walking the Course:
It was now almost 12:00noon.
The officer gave us a map of the Practical Driving Test Course for foreigners
and said we could walk the course during the Lunch Break if we wanted to. I would highly recommend this to anyone! Since I don’t understand very much Japanese,
it was critical that I had the entire course memorized before taking the actual
test.
 |
| Note the beautifully manicured lawns on the closed-off driving course. |
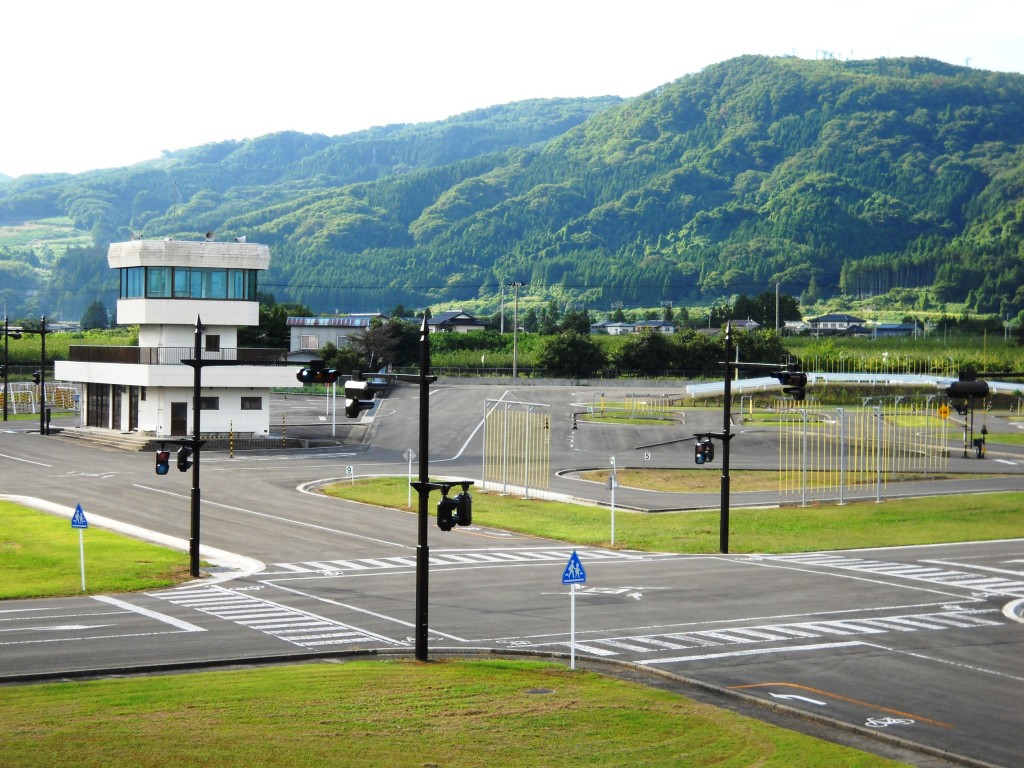 |
| They even have remote-controlled traffics lights and a control tower. |
 |
| The "road obstruction" on the course had moss growing underneath it! |
The Practical Test:
At 1:00pm we were met in the lobby by an officer who would
serve as the driving test proctor. He
called out our names (mine and Joel’s, and a lady from the Philippines) and
told us which order we’d be driving in.
As we walked out to the course a bit of advice from a former English
teacher in Japan came to mind:
“The most important thing to
realize is there is nothing very practical about the “practical” test. It is a test of your ability to precisely
follow a host of rules while navigating a set course.”
 |
| A bird's eye view of the 福島県運転免許センター Driving Course |
Here’s a little
information about the “practical” test:
It’s conducted on a completely closed off, controlled course. Usually you are the only car on the entire
course; there are never any pedestrians or bicyclists. There are over 70 ways to lose points on a
test (such as forgetting to look underneath
the car before you get in); if you make 3 or more mistakes you’ll likely fail
(see below for a list of instant fails).
Only 1/3 of foreigners taking the
“practical” test pass on their first attempt.
On average, one must take the test 3 times before they pass.
Instant Fails:
·
Hitting a
curb, sliding against a curb, or going over a curb. (The only exception is in
the crank. If you run up against the curb, you can back up and try again, but
if you go over it, it is a fail.)
·
Not stopping
the full three seconds at stop signs and blinking red lights.
·
Forgetting
to look over your shoulder.
·
Forgetting
your turn signal or signaling too late.
·
Going too
fast around curves (and not pumping your brake beforehand)
·
Using your
brake in the middle of a curve (you must slow down adequately before the turn; the exceptions are the
crank turn and the S-curve – you can brake through these turns)
·
Going over a
triangle or a line when turning.
·
Making left
turns too wide.
·
Not lining
up with the pole at the end
·
Not staying
left enough (you must be 30cm or less from the solid line)
·
Not going
fast enough over the straight sections
·
Driving in
the wrong lane (yes, you do stupid things when you're nervous)
General Guidelines
to follow:
a. Stay to the left.
This is Japan, so everything is opposite. The left lane is for driving and the right
lane is for passing. If you see a wide lane that could fit two cars, then
consider it as 2 lanes whether it's marked or not. If you drive down the
center of a double wide lane you'll fail the test for sure. Don't drive
in the gutter either, but stay within
one foot (30 cm) or so of the left gutter.
b.
Changing
lanes: when you need to get in the right lane (for example to make a right
turn), then signal in advance, check
your mirrors, glance back over your
right shoulder: blind spot and change lanes.
c.
Show
the instructor that you are looking
everywhere. Move your head all around in an exaggerated way to show
you are looking in your mirrors and checking over your shoulder. If
turning right or changing lanes to the right, look over your right shoulder.
(If your neck is sore by the end of the test, you just might have been
looking around sufficiently.)
d.
Left
turns: (signal, mirrors, blind spot) then look
down the left side of your car (to make sure you aren't going to run over a
bicycle or pedestrian). Even when I
obviously checked for the imaginary bicycle at every left turn the proctor
spoke about this at the end of the test.
e.
When
passing cross streets or intersecting streets: obviously turn your head just to make sure some crazy, imaginary
driver isn't going to suddenly emerge.
f.
Stop
with your bumper behind the line at stop lights and stop signs. Slow down
in advance so you don't jerk to a stop at the line. Don't stop too
soon. One person in my group failed for stopping too soon at a stop
sign. (Stopping wasn't a problem. The problem was that he
should have stopped again when he reached the sign. He didn't, so the
tester considered that rolling through the stop sign.)
g.
Be
cautious and drive slowly. Unless you take this to extremes, they won't
fail you for being too careful or driving too slowly. (Note:
when you are on the road that goes around the perimeter of the course,
the driving test proctor may tell you to speed up a bit).
h.
Make
good, clean turns at all times. Don't swerve right before turning left,
or vice versa. When you turn, remain 30
cm or less from the curb, but be careful not to hit the curb when turning. If you ever run up on a curb
that's an instant fail. Do NOT use your brake during the turn (that’s an
instant fail).
 |
| The car that we took the "practical" test in |
Step-by-Step instructions:
While researching how to pass the
practical test, I found a list of 30 very
detailed instructions. Here are the
first three (that explain how to get into the car, make your preparations, and
start the car). If you want to see the
entire list, click here.
a.
Before you get
into the car:
1.
check in front of
the car
2.
check behind the
car,
3.
check under the
car
4.
Look to the left
and right before you open your driver’s door (use both hands to open door)
b.
Once in the car
the driving test proctor will tell you to “make your preparations.”
1.
adjust your seat,
2.
fasten your seat
belt,
3.
lock the door, (you
may fail if you forget to do this)
4.
become familiar
with where everything is (obviously press your foot on clutch, brake, gas
pedals).
5.
Make sure the
emergency brake is on
6.
Adjust your
rearview mirror and check your side mirrors.
c.
Starting the car:
1.
put your foot on
the brake
2.
turn the key in
ignition to start the engine
3.
Holding the brake
down with your right foot, shift the car into the ‘drive’ gear
4.
release the
emergency brake.
5.
Use your turn
signal to signal a right turn (away from the curb where you are parked). Look 1) in your rearview mirror, 2) in
your right/driver’s side mirror, 3) over your shoulder to check your blind spot
(assume you are entering traffic), and then go straight forward.
As you can see, the driving center is pretty specific as to what they're looking for. Equipped with all this information,
Joel and I bravely made our first attempt to pass the “practical test.” Everything was going well until I encountered
this road marking just before a traffic signal intersection:

During the walk-through, Joel and I
surmised that this marking indicated a left turn lane for a bicycle, and that
we should avoid driving on the yellow line.
Both of us ended up failing our first attempt because of it! After I completed the driving test, the
proctor asked Nomura Sensei to get in the car so he could translate for
me. He explained many errors to me: I didn’t drive fast enough on the perimeter
road. I looked left and right, but
didn’t really confirm that there was
no traffic coming. Apparently, although
the proctor acknowledged that I turned my head to glance for the imaginary
bicycle before my left turn, he didn’t believe that I was really looking for
it. (How do you really look for an imaginary bicycle?) My left turns were too wide. “In Japan we have a rule,” he explained,
“that you must stay very close to the
left side of the road – especially when making a left turn.” The trouble is I knew all that information already, and I thought I had followed it
precisely. I racked my brain for which
turn I screwed up on. It must have been
the turn with the supposed bicycle lane.
 |
| The test proctor explaining to me what I did incorrectly during the test. |
It was only later in the afternoon,
when I was talking to the Filipino woman (who was on her 4th attempt
to pass the driving test), that I discovered what the bicycle marking really
means: bicycles must leave the road at this intersection
(keep in mind that there are never any bicycles on the driving course). So, after waiting 45 minutes to receive the
test results, Joel and I both got the announcement that we had both
failed. (The good news is that the woman
from the Philippines passed!) So we
rescheduled for next week and left the center by 2:45pm.
Once we were out in the parking lot,
Sensei handed me the keys. “Will you
drive home?” he asked. We both
chuckled. I may have failed my first
attempt, but my International Driver’s License was still good until
December. During the 20 minute drive
home I successfully navigated many narrow, crowded roads (with trucks and other
on-coming traffic), avoided road obstructions (such as parked cars,
construction workers, and even a little dog in the road), yielded to traffic
while making right turns, backed out
of a small restaurant parking lot onto a one-way street – all without
incident. However, according to the
Japanese Driver’s License Center, I wasn’t a safe enough driver to pass the
test. Figures. I guess I still need more practice looking for imaginary
bicyclists and keeping left, time and
time again, until I attain the precision that the Japanese people so
persistently strive for.